Thursday, April 29, 2010

Out of the Loop

Sorry, guys, I've been out of the loop for the last couple of days due to an emergent family medical situation.  (Don't worry, we're all fine!)  I should be back to blogging now, but my sewing will probably be neglected for a few more days while I catch up on real-life stuff like buying groceries, doing laundry, and finishing my chapter.

Before I left town, I made some great progress on my WGD, which is looking awesome!  All it needs now is some inside finishing and a hem.

I also want to give a giant shout-out to the ladies at the Southeast Michigan PR group.  I had a blast at the meet-up on Saturday, and got some great advice on my dress.  Hopefully, I'll still be able to make it to this week's meet-up: I've got miles of seriously boring hemming in my future!

Thursday, April 22, 2010

Brunch Dress: The Planning Stages

My pattern paper is finally here, so while the bias skirt for my WGD hangs out, I can start drafting my next project, a summer dress.  This dress is also for the wedding I'll be attending in May, but unlike the satin dress, it should be much more re-wearable.

Having just had a wedding myself, I'll share my opinion that weddings are one of the few opportunities for adult, professional women (and men, if so inclined) to color-coordinate unabashedly.  Cousin Angela's "wedding colors" are shades of blue, and I've definitely jumped on the bandwagon.  The dress I'm sewing next will be for a swanky ladies-only pre-wedding brunch (with hats!)

Here's her invitation:


And here's the paisley cotton voile from Haberman's that I'll be using.  I think it has a very "brunch-with-the-ladies" vibe.


(As a died-in-the-wool academic, I can't resist pointing out the imperialist back-history of paisley, whose popularity in 19th century England reflected that nation's colonial presence in India.)

I'm planning a simple, sleeveless dress with a surplice v-neck and an A-line skirt.  Something similar to Vogue 8182, which I used to approximate my yardage.  I'm planning to use darts instead of gathers on the bodice, and a smooth waistband rather than a ruched one to get a sleeker look.

Since I'll be drafting this pattern from scratch, I figured it would be a great opportunity to write and share a series of drafting how-to's for each of the components of this dress: a midriff yoke, a surplice top, and an A-line skirt.  I'll be using my sloper as a basis, but if you don't have a sloper, you could use a pattern for a basic dress that fits you well.

So stay tuned for the first installment of the series, which will be about drafting a midriff yoke!

Wednesday, April 21, 2010

WGD 2.0: If at first you don't succeed...

Ok, folks.  I'm chalking up my first attempt at the wedding-guest dress as a "learning experience," and starting again from scratch.

Just to remind you, this is what I'm aiming for.  The original dress, called "Retail Therapy," is sold out on ModCloth.


Overall, I think my pattern is solid, and I've only made a few small adjustments to the fit for my second attempt.  I think the main problems were fabric choice and construction.

The poly charmeuse I picked the first time around is way too light and drapey, and it doesn't really stand up to the more structured look of the dress.  Also, the fabric is really shiny, which just makes the whole thing look cheap.

For my second attempt, I ordered up mid-weight poly satin from Fabric.com, and I'm much more pleased with both the color and the hand.  The charmeuse is on the left, and the satin is on the right--look at the contrast!


Fabric choice aside, my real sins with this first attempt were in the construction.  I chose not to interface the neckline, since you could definitely see a line on the right side of the fabric where the interfacing stopped.  This was a mistake.  As a result, the stand collar is droopy, and the neckline is rippled where I sewed the bodice to the lining.  I also rushed to get the skirt on and the zipper installed, again omitting interfacing, which led to (you guessed it!) more ripply seams and the most horrible, unwearable wavy zipper ever.  It's so bad, I won't even show you a picture!

Believe me, I've learned my lesson!  This time I'm interfacing EVERYTHING.  I'm also going to be much more careful not to stretch or ease my fabric when I'm pinning or sewing on the bias.  Hopefully, the heavier fabric will help with this too--unlike the charmeuse, which was super-fluid, the satin holds its shape and stays on-grain much better.  I'm also planning to hand-baste my zipper before I sew.

So far I've cut the bodice and sewed the bodice lining (which is also cut from satin), and I'm pretty pleased with the results.  My one concern is pressing: the satin doesn't want to hold a crease, and when I press it enough to flatten out a dart, it leaves a faint, shiny mark along the edge of the folded fabric underneath (if that makes sense).  I'm thinking right now that I'm going to press it anyway, figuring nobody will notice the marks.  But I'm open to suggestions: what are the "best practices" for pressing satin?

Tuesday, April 20, 2010

Liberty blouse--a prescient design

Liberty of London fabric has been pretty visible these days, what with the recent release of Target's line of Liberty stuff. I admit, I bought one or two of my own Liberty for Target items--a top for myself,  and a shirt for the Mister--the price was too good to pass up. But it also got me inspired to plan a sewing project with real Liberty cotton lawn, which is worlds away from the polyester used in much of Target's line.

When the Selfish Seamstress posted about the new Burda May preview, I couldn't help but notice this top:

Looks familiar, I thought. Well, it should. I own this fabric in a slightly different (I think better) color. I bought it from Emma One Sock a few weeks ago and it's still available, if anyone else is interested.


What had I planned to sew with this lovely, summery stuff? A blouse, of course! I plan to copy an RTW blouse that I love. It has small pleats all along the front and back neckline, but is still nicely fitted through the waist. I'm not sure whether I'll include a ribbon waistband, like the original, or whether I prefer a more pared-down look.

This is, of course, a drafting project, so it will have to wait 'till I've finished the dresses for the wedding I'm attending in May. (Yes, dresses, plural, because of course I need a paisley cotton sundress to wear to the ladies-only pre-wedding brunch!)  And I can't draft anything till my new pattern paper gets here. But I admit, I'm gratified to see that my fabric choice for a summer blouse wasn't way off base.

JEANS!

My jeans are finally finished! Here are some pictures, and below is a complete overview of the project.


Pattern

For these jeans, I used the pattern for hip-fitting jeans from Schnittvision Vol. 7. (The program also includes a pattern for jeans with a higher rise.) Once I got the software working, it was easy to enter my measurements and print the pattern. Although the pattern was already fitted to me, I still made a few adjustments, using my favorite pair of Express jeans as a point of comparison:
  • On both the front and back pieces, I added 2-3 inches to the width of the leg at the cuff, tapering to nothing at the knee. Despite looking really flared in the picture, the original pattern would have yielded more of a boot-fit based on the finished measurements. I also lengthened the legs a bit, so I'd have lots of room for adjustment and for shrinkage.
  • I drafted my own pattern for a coin pocket, which wasn't included, again using my own jeans as a model.
  • Based on my first test fit, I added 1/4 inch to the width of the thigh, tapering to nothing at the hip and at the knee. (I guess that's what I get for training to run a marathon--beefy thighs!) There is a "prominent thigh" option when you're creating the pattern, but it seemed complicated, and this solution was easy enough.
  • I increased the width of the waistband from 2 to 2 1/2 inches, since with the original waistband they were too low rise for comfort. Adding this extra height created gapping in the back. But since the waistband was already seamed at the center back, I made an adjustment there to eliminate the gap
There's a lot to like about the Schnittvision jeans pattern--first and foremost that it is custom-fitted to one's own unique derriere. Overall, I was quite pleased with the pattern, but I do have a few quibbles. First of all, the pattern didn't have consistent seam allowances--in some places, the allowance was 5/8 inch, and in others it was closer to 3/8. Which meant sometimes I was trying to sew french seams with only 3/8 inch to work with. I'm certain these differences in the seam allowance were intentional, but I'm not at all sure what their intention was. And it meant I had to check the seamlines on my paper pattern pieces before every step.

My other problem was with the pattern for the front pocket bags, which inexplicably had neither a fold line nor a seam allowance on the edge closest to the center front. Maybe they thought the raw edges of the pocket would be captured during the zipper installation, but because the fly is asymmetrical, that only worked on one side, so I had to go back and sew it closed after the fact. These are hardly major problems, and to be fair, perhaps some of them might have been avoided if I had been able to read the instructions.

In the end, I'm also not completely convinced by the fit.  Despite my adjustment to the waistband, these jeans are very low rise in the back, and sitting or bending over can be a bit dicey.  When I make my next pair, I'm definitely selecting the "round bottom" option, rather than the "regular" option, when I create my pattern in Schnittvision.  (Silly me, assuming that my bottom was "regular"!)  I'm pretty sure that will fix the problem.

Materials
  • mid-weight dark wash stretch denim, 1% lycra. From Joann Fabrics, on sale & with a coupon, for less than $5 a yard. (I don't remember exactly how much it ended up costing, but it seems like Joann has denim on sale pretty often.)
  • Gutterman jeans topstitching thread, plus regular navy thread in the bobbin
  • metal jeans zipper, which I had to shorten considerably
  • Tack buttons from ebay
  • rivets from Haberman's
  • lightweight woven interfacing
  • one pair of old boxers for the pockets
  • PVA bookbinder's glue for basting--this is basically elmer's glue, only better, and in large quantities

Construction

Since I couldn't read the original instructions in German, I used the dowloadable instructions for Jalie's stretch jeans, and referred frequently to Johanna's tutorials.

I basted with glue a lot and I wish I could do it all the time. I found that when I used glue, I usually didn't need to iron to get a sharp corner, so that simplified the pockets a great deal.

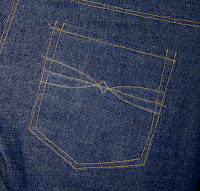
I drafted my own pattern for the decorative stitching on the pockets, then made a template from an old file folder. To get the full pattern, I just drew the center line, then traced this template twice, once right-side-up, and once upside-down.

My sewing machine is a vintage all-metal Kenmore machine from the 60s or 70s, and it handled the denim beautifully. I used a jeans needle, which also worked great. At times, I needed to hand-crank my machine, but mostly it did fine on its own. I did try one trick for sewing the really bulky places where several seams come together: After sewing the seam, I took it out to the garage and hit the lumpy part with a hammer a couple of times before I topstitched it. I think it helped flatten the seam and made it easier for my machine to sew over it.  That said, I definitely have a jean-a-ma-jig on my wishlist for the future.

I was initially worried about sewing the fly, but it turned out to be really easy, and mostly intuitive. It was also really satisfying, because the results look so professional when you're done, especially with a metal zipper. The hardest part was removing the zipper teeth to shorten it. In the end, I gave up and handed it over to the Mr., who had much more success. He claims that the key is to grab the tooth only at the end, so you aren't pinching it closed at the same time that you're trying to pull it loose. But I couldn't make it work no matter what I did.

I used french seams throughout, and I topstitched most everything except the side seams below the hip. There, I used a decorative stitch instead of a bar tack to end my line of topstitching. If you look carefully, most RTW jeans also don't have topstitching all the way down the leg, either.

I followed the advice of the folks on pattern review and washed and dried my finished jeans several times before finally hemming them. I also washed and dried the fabric before I cut, so hopefully it won't shrink too much more at this point.

Shout-Outs

When I was getting ready to do this project, I read everything I could about jeans. I'm certain I haven't attributed every tip or technique I used, but here are some of the many awesome reviews, tutorials, and other resources out there for sewing jeans.

Sunday, April 18, 2010

BurdaStyle Ute: Victory from the Jaws of Defeat!


Here's my finished blouse based on BurdaStyle Ute.  It's perfect for the spring weather we've been having, and I'm so pleased with how it came out!


I love this fabric--it's a printed cotton voile from Haberman's, and I immediately envisioned it as a blouse.  I liked the idea of using Ute, but my first attempt was thoroughly disheartening.  I'm still somewhat unsure about my size in Burda magazine and BurdaStyle patterns; since I was between the 44 and the 46 by my measurements, I cut the 46.  I constructed the whole bodice with french seams before I test-fitted it and discovered it was huge on me!

To save the project, I had to rip out all those french seams, which was really time-consuming.  After pressing my pieces flat, I cut the pattern down to a 42 and laid it over the original pieces, making sure the fabric stayed on the straight grain.  I was able to re-cut all the pieces except the collar and the side front from my original pieces, and bought another yard of material to use for the new pieces.

I used several new techniques in making this blouse.  I'm most pleased with the bias binding on the collar, which yielded a really slick, professional finish.  I also used french seams on the armholes for the first time.  I wasn't even sure it would be possible, but it turned out to be almost easier than easing them in with a 5/8-inch seam allowance.  I think fabric has a lot to do with this--my voile was very light-weight and fluid, which made it much easier to make my seams smooth and even.

I found great vintage buttons for this project in Montreal, at Plazatex fabrics in Mont Royal.  They were a perfect match for the green in the print, and I think they add to the funky-girl-scout aesthetic of the Ute pattern.  As you can see, I'm also sporting my new "made by J" labels.  (If you're looking for twill tape labels, I heartily recommend Priya Creations on Etsy.  She was prompt and accommodating, and I got exactly what I wanted.)

With this project, I feel like I snatched victory from the jaws of defeat.  I was so disappointed with my first attempt, and I wasn't sure I'd be able--or willing--to salvage it.  But I think the finished product is among my best in terms of quality, and it fits seamlessly into my summer wardrobe.  I'll be wearing it tomorrow!

Sunday, April 11, 2010

That awkward stage

Sigh!

My wedding-guest dress is at that awkward stage.  You know, the one where you've done enough construction to know that it's not quite right, but you haven't figured out how to fix it yet?  Ever notice that you always seem to hit that stage about an hour after you should have stopped and eaten something, or put the project down and gone to bed?

My plan is to leave it be for today and work on my jeans.  I'll tackle it with fresh eyes later in the week.

Sunday, April 4, 2010

Peaceful coexistence?

This weekend, I made a muslin that I'm really pleased with. But I also made a mess. A big one.


We live in a small-ish apartment, and my "sewing room" serves double-duty as our living room. My sewing machine folds away into a table, and so lives permanently in one corner of the room. When I'm going to be doing a lot of drafting, I set up this folding table on the other side of the room. Then I proceed to cover every flat surface, including the couch, with paper, fabric, lucite quilting rulers, pens, pencils, scissors, wads of snipped threads, and of course, pins that nestle themselves into the berber carpet and wait for someone innocent and unsuspecting to walk by with bare feet.

What about you? How do you manage your mess? Is it possible for sewing to coexist peacefully with other living-related activities in your living room?

Best. Muslin. Ever.


Yowza!

This is the muslin for my wedding-guest dress, and let me just say: I looooove it! It's a little hard to see all the details in these pictures, and since my muslin is slightly sheer, I can't show a back-view for modesty reasons. But it looks just the way I pictured it in my head, and it fits great! It will look even better with the drape of the charmeuse, but I think it looks pretty darn good in muslin. And the Mister seems to agree ;-)

I had one false-start with my bodice pattern: remember folks, if you want a surplice top to overlap by x inches at the center front, you need to add the full x inches to each side. Then, when I revised the bodice pattern, I mysteriously added 2 extra inches, probably due to my pattern-paper-shenanigans.

As I mentioned, I did some really shady slash-and-spread pattern drafting this weekend in an attempt to conserve my last bit of pattern paper. I think I'll get away with it (knock on wood), but that doesn't mean it was a good idea. Don't do this!


At this point, I've drafted everything except the skirt lining, and I've used every scrap of paper in our house. But based on this muslin, I'm feeling confident and ready to cut.