Wednesday, March 31, 2010

Projects in a holding pattern

It's April (almost!), which means that the end of the semester is coming soon, and school is getting ready to kick me in the [part of the body that would hurt when kicked]. But I've still been making uneven progress on several projects. Here's an overview:

Jeans

The jeans look great. I've done everything but finishing the waistband, and I've got my rivets, tack buttons, and belt loops ready to go. But I'm waiting for my new "made by J" sewing labels to arrive so I can sew one onto the waistband facing before topstitching it down. These jeans are an accomplishment for me, and I can't resist tooting my own horn a bit, even if no one else ever sees it. Currently, the post office is holding my labels hostage (don't get me started on the post office!), but I hope to have them in hand by the end of the day today. In the meantime, I've been reading all the posts about rivets on the Pattern Review jeans sew-along to educate myself about what lies ahead.

I plan to do a full write-up with better pictures once I get my jeans done, but here are some quick snapshots to tide you over. Sorry for the poor quality--my "resident photographer" had to study for an exam this morning!


Wedding-Guest Dress

Many months ago, I had this idea for a dress to wear to a family wedding in May. Since then, I've changed my mind several times, but I've finally decided on this design, which will be more versatile:


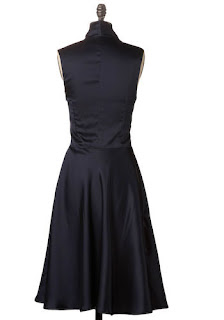
The original dress is sold out on Modcloth, and the pictures are no longer on the site. I'm planning to make my version very similar to this one, with a few minor adjustments: I've made the curve of the raised waistline more gradual at the center front, and I've increased the overlap of the surplice top so it will be less cleavage-tastical. (Several of the reviews mentioned needing double-sided tape--not the look I'm after for a family wedding!). I'm making it out of navy polyester charmeuse, same as the original. Why mess with a good thing?

I started drafting this dress over the weekend, and I got the front mostly done when I ran out of pattern paper. Look at this skirt pattern! This is me trying desperately to use my last scraps of paper to stabilize my pattern, which was held together only by delicate paper hinges. It looks like Frankenstein's monster!


I scored a little more paper on Monday, hopefully enough to finish the project. But I definitely need to find a more reliable paper supply.

Cotton Print Blouse

Stymied in my attempts to work on my jeans and my dress, I started in on another project in my queue--a cute cotton print blouse. I bought this cotton voile months ago, but now it's finally warm enough to think seriously about spring blouses.


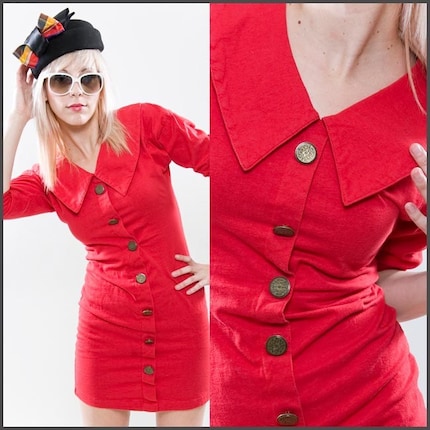
I debated, and finally decided on BurdaStyle Ute:


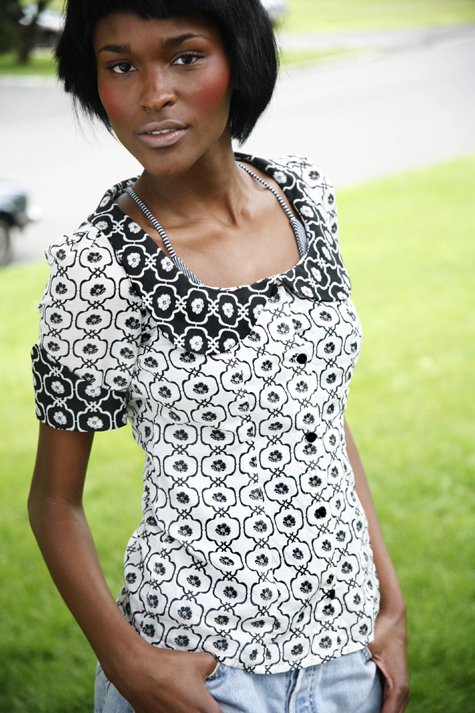
I opted for version A, with the peter pan collar, omitting the crazy cuffs. But I also like B, with the tie collar, and I've got my eyes on it for a subsequent project.

Simple enough, right? Wrong! First of all, my computer pitched a giant fit when I tried to print the pdf file--I've never had this much trouble with a print-at-home pattern before! I had to download Acrobat to make it work.

Now, I know, a sensible person would've done a muslin of a new pattern, even if the measurements for a given size matched her body perfectly. Failing that, a sensible person would have at least basted it together to test fit before sewing time-consuming french seams. Did I do any of these sensible things? Of course not! I forged right ahead. And look at the results:


It's huge! It looks like a house dress! I know the pattern is supposed to be a slightly relaxed fit, but this is not what I was after. I think I need to take out all my beautiful french seams, press the pieces, and re-cut them 2 sizes smaller. Some pieces, like the center front and the collar, I'll have to cut again, but I'm planning on fudging the others. I bought another yard of fabric, but I still have to wash it and dry it before I can do anything else.

I'm convinced I can salvage the project, and I still love the concept, but I admit I'm a bit discouraged. I'm planning to set this project aside for a bit and wait for a second wind. It's not like I won't have enough to work on in the meantime!

Wednesday, March 24, 2010

Post-script: Even less original than I thought!

Ok, so I knew it was unlikely that I'd actually had an original design idea, but here's proof that I'm a shameless (if unknowning) rip-off artist!

Not only is my Mad Men dress very similar to a dress featured on the show, but it's also shockingly similar to this dress.

And the lovely lady wearing it? The Selfish Seamstress, of course!

And my post about drafting the collar? Again, I thought, very original, right? Would you believe that the Selfish Seamstress has shared her collar design too, in the form of a super-slick free pdf download?

Would you believe that I've certainly seen this dress on her blog, and her design must have seeped into my unconscious? That I had forgotten ever seeing it before? And that I randomly stumbled across it again immediately after publishing my now super-lame rip-off post?

So, to my (likely non-existant) blog readers, I'm sorry for being so lame. And Elaine, please believe that imitation is the sincerest form of flattery!

Tuesday, March 23, 2010

Drafting: A flat-fall collar

I realize that part of the fun of reading sewing blogs is getting information about a pattern you might be inspired to sew. Does a certain pattern run big? Does it flatter? Is it easy to sew? Since I'm drafting most of my own patterns right now, I thought I'd post from time to time about how to draft some of the design features I'm using in my projects. Hopefully, that way I can still share my learning experiences and occasional insights with you all.

First, a quick caveat. I've learned everything I know about pattern drafting (more or less) from two sources: Gwen Powel, the instructor of my pattern-drafting class, a woman who's got the skills to to pay the bills; and Norma Hollen's classic textbook Pattern Making by the Flat Pattern Method. I'll occasionally quote from Hollen's book, as I do in this post, and when I do so, I'll attribute it. And, if you're at all interested in learning pattern-making, Hollen's book is available on Amazon, and it's a comprehensive and invaluable resource.

Drafting a flat-fall collar, like the one I used on my Mad Men dress, is incredibly simple. First, you need to establish your neckline in the front and in the back. If you're using a sheath dress pattern (either commercial or your own) as the basis for your design, you might not need to make any changes to the neckline at all. If you're working with a personal sloper or "basic pattern," however, you'll probably need to lower it. There are no hard-and-fast rules for this--you can use a RTW dress as a model, or as Hollen suggests, mark your intended neckline on a muslin with pins or chalk, and check to see if it is "becoming" on you. If you adjust your neckline, use a curved ruler (or rounded household object) to create a smooth curve, and make sure that your new neckline is perpendicular to the Center Back, Center Front, and shoulder seam lines, otherwise, you'll create funny protrusions in those places when your pattern is assembled.

Next, decide on the width of your collar, and trace a second line the appropriate distance below your neckline. For this dress, I made my collar 2 inches wide. As with the neckline, though, you probably want to consider both the scale of the print on your fabric (if any) and your own proportions, in deciding on this measurement. As they say on What Not To Wear (not that I watch it, or anything), clothes and accessories flatter best when they are "to scale" with the person wearing them.

Trace the collar onto a separate piece of paper, add seam allowances, and transfer the grainline from the bodice of your dress. Then you're good to go!

To make the button detail on my collar, I decided on the location of the overlap, then added an extension for the tab and button, again, just drafting "by eye." (Once you've drafted the collar overlap, remember to mark its location on your bodice neckline with a notch, so you can line your pieces up correctly when you sew.) I also drew a new grainline, at a 45-degree angle from the original grainline, so that my collar would be cut on the bias. I did this for style reasons--I wanted the plaid to be on an angle for visual interest--but since fabric drapes differently on the bias, it probably has other consequences for my design that I haven't really considered.

Here are my final pattern pieces. (Ignore the grain line markings on the front collar pieces, which clearly don't match up. I did cut the pieces correctly, using a modified version of the Selfish Seamstress's plaid matching technique.)


Usually, on a dress like this, the collar would separate in the back, on either side of the back zip. So you would cut the front collar on the fold, and for the back you would cut the collar in two pieces. But since I wanted to add the button detail in the front, I decided to have the collar run all the way around the back uninterrupted. That means I cut the back collar on the fold, and I cut two, asymmetrical front collar pieces. It also means my zipper stops just below the neck, and the dress doesn't open all the way. How you choose to style a collar like this is entirely up to you, but you do need to think ahead about the implications of choices like these for the rest of your design and its construction.

You could use this basic method to draft other styles of flat collars, too. For instance, change the shape, and you get a sailor or sailor-inspired collar, like the one on this sassy vintage dress.

(image courtesy of BillyGoatVintage's Etsy store)

Or make a peter-pan collar on a blouse or dress with a front button closure, like this one:

(image courtesy of Modcloth)

I hope this post was helpful--please let me know if there are things I should clarify on this post, or that I should do differently in the future.

Sunday, March 21, 2010

The Schnittvision Saga


Like many of us, I was tempted when the Selfish Seamstress posted about Schnittvision, a German software program that yields a series of chic, versatile, contemporary patterns based on your particular measurements. And it was even on sale!

In the end, I succumbed. I had to have it. But getting it was not easy. First, I had to navigate the order form in German. To avoid the hefty surcharge for international shipping, I recruited my mother-in-law, who works for a large multi-national corporation. She contacted a German colleague, who agreed to carry the software over from Germany on his next business trip. Once I got the disk, installing it on my computer was a little tricky, since important locations like "Program Files" have different names in other languages. Fortunately, the Mister is a genius, and he figured out a solution that worked like a charm. (NB: if you have Schnittvision, and get error messages about libraries that cannot be found, let me know, and I'll share his fabulous workaround with you!)

Today, I write to tell you that it was all worth it: I'm almost done sewing my first Schnittvision pattern, and I'm thrilled with the results. I decided to buy Volume 7, "Neo-Chic," in large part because it included a pattern for flared jeans. Well, here's a sneak preview of my jeans:


With the exception of adding a little room (like a quarter of an inch) through the thigh, and increasing the width of the waistband a bit, I've made no adjustments to the fit of the jeans, and they're perfect! (I've put the jeans together since these pictures were taken, so I have in fact tried them on.) I also increased the flare below the knee, purely for aesthetic reasons.

I'm totally gobsmacked by the fact that I'm sewing my own jeans, and even more so by how good a fit I got from the Schnittvision pattern. They're almost done and ready to be worn, although I won't be able to pick up any rivets until next week, and I'll be doing a full write-up of the project soon.

Friday, March 19, 2010

My Mad Men dress


This is my "Mad Men" dress, the second dress I've drafted myself:


As I mentioned, many of my drafting projects have been "inspired by"--ie. straight-up knock-offs of--ready-to-wear garments designed by someone else. But the design for this dress was entirely my own...I thought. I envisioned a slim-fitting sheath dress in a dark wool plaid with elbow-length sleeves, bias trim on the sleeves and collar, and an asymmetrical button detail. Here's my original sketch:


I used this 3-season wool from gorgeous fabrics, which I had seen online and had in mind while I was designing the dress. The fabric was expensive, but I was able to get the dress out of 2 yards, which kept the cost within reason. I always intended for the dress to be fully-lined, and I'm glad because, although its beautiful, this wool is also itchy!

The aesthetic was definitely retro and Mad-Men-esque, and I started referring to the project as my Mad Men dress while I was sewing it. Then, low and behold, look what I saw!


Now, I can't be certain, but I'm pretty sure I designed my dress before I saw the episode where she wears this. Peggy's dress has some outrageous details (like the plaid bow at the waist and the off-center button placket on the skirt) that I don't think I could pull off in real life, especially as someone with a fuller (indeed, one might say, a more Joan-like) figure. But the silhouette is similar, as is the scale of the plaid. And check out the flat-fall collar cut on the bias--look familiar?

From a drafting and construction perspective, there were several "firsts" involved in this project. This was my first time drafting and sewing a kick-pleat, and the lining proved a bit tricky. I tried to copy the construction of a RTW Banana Republic skirt, and I almost got it right! The sewing is a bit dodgey, but not bad for a first effort.

Kick-pleat on the outside--not so bad:

But on the inside...eep!

Oh well! I'll do better next time.

I also put a good bit of thought into how to do the overlapping part on the collar and the sleeve bands. I ended up sewing the band and the facing together at the lower edge and around the tab. Then I slashed almost to the stitching line right where the tab section ended, trimmed the rest of the seam allowances super-short, then turned it and pressed it. Then, I sewed the collar/band to the dress and hand-stitched the facing on the under-/inside. (If that makes any sense.)

Here's a close-up of the collar detail:


Finally, not to gloat, but check out this invisible zipper. Not to shabby!


In the end I think I achieved a look that is vintage-inspired without being too hard-core or costume-y, which was my goal. I love the fit, although it's a little short for my comfort-zone when I'm sitting. And I got compliments when I wore it to a recent conference. So I'm calling this dress a success!

Back after a hiatus--and lots of drafting!


Hi there all my (largely imaginary) blog readers! I'm back after a bit of a hiatus. I may not have been posting, but I have been sewing, and I'll try to get my recent projects up on the blog over the next week or so.

Right now, I'm finishing up the second in a series of three pattern-drafting classes offered at Haberman Fabrics. I've learned a ton, and at this point I know how to draft most of the styles I'm seeing in stores and on pattern envelopes. But since most of our work in the class itself has been practice drafting problems on a half-size sloper, I have a lot of miniature patterns and not a lot else to show for my efforts.

As of right now, I'm finding myself much more inspired to draft patterns than to buy big 3 patterns or Burda mags, and I think there are several reasons for this. One is expense: drafting is time-consuming, but free, and patterns can be pricey! Another is fit: I'm right on the bubble between regular and plus size, and I've had distinctly mixed success with commercial patterns as a result. One example was my attempt to make this skirt from BWOF 8-2009, which resulted in an epic fail (it's still wadded up in a corner of the living room waiting for me to salvage the zipper and trash the rest). If you start with the assumption that you will need to make some alterations to any commercial pattern (and for me this seems to be true), you might as well go to the extra effort of drafting and get a perfect fit. And I think the third reason is creativity/intellectual challenge. I love the puzzle of looking at an outfit on the street, or one of my favorite RTW pieces, and thinking "How would I draft this?" It can be so satisfying to figure it out! And I love the idea of making it exactly how I want it, even though most of my "orginial" designs so far seem to be fairly close copies of garments designed by someone else.

Despite all the half-size drafting, I have done a few full-size, wearable projects over the last few months, and I'll be posting about them soon. My recent drafting successes include a denim tulip skirt and a killer Mad-Men-esque wool dress that fits like a glove. And I'm at work on my first ever pair of jeans--so stay tuned!