Check it out: my first ever bound buttonhole! (Above it is the button I've selected, a large-ish leather knot that I think goes along with the trench-coat vibe of the Lady Grey coat.)
As I mentioned in my last post, I had been planning to do bound buttonholes on my coat, but I didn't realize that I needed to do them before basting in the hair canvas. So my compromise will be to do a bound buttonhole on the right side, which will show when the coat is buttoned, and a plain buttonhole on the left side, which will be hidden.
I've contemplated bound buttonholes before, and I've read a few tutorials, but I've always been daunted, especially by the step where you sew over the tiny triangles to attach the the "lips" of the buttonhole. They just look so tiny!
So I was pleased to find that the whole process was easier than I had feared. The organza backing really makes it easy to control the fabric, and sewing over the triangles is really no sweat.
The main thing I want to improve for my next buttonhole is the marking/alignment. If you look carefully, I think this one is just a tiny bit caty-wompus, and I know I wasn't super-careful when I marked it. Next time, I think I'll mark the true grain carefully on the fabric before I start, to give me a reference-point when I mark the actual buttonhole.
But for a first effort, I think, it's not too shabby!
Showing posts with label techniques. Show all posts
Tuesday, November 23, 2010
Tuesday, July 13, 2010
Denim Pencil Skirt Completed
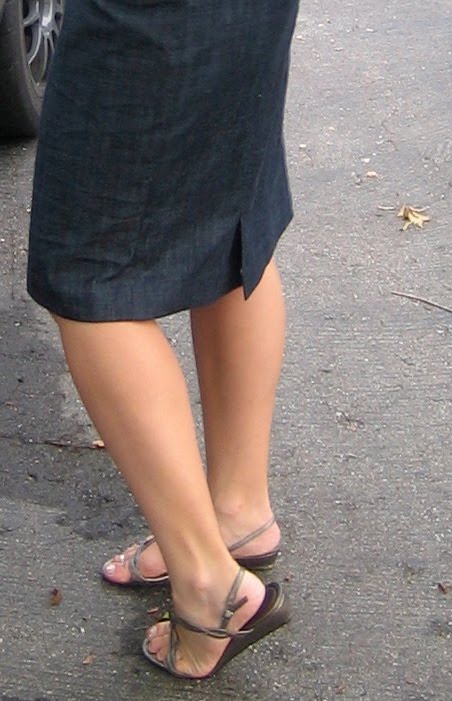
I was sewing until almost midnight last night, but I finally got my denim skirt finished for the PR Knock-Off Contest, and I was able to snap some photos this morning before it started raining. I'm totally pleased with the result: the fit is good, and I was able to reproduce all of the details I liked in the inspiration piece. Plus, this skirt bridges nicely between casual and wear-to-work, which is exactly the kind of clothing I currently need most.
Just as a reminder, here's the inspiration skirt:
And here's my version:
Design Elements:
The pleat and pocket are spot-on, and add a nice bit of interest.
The back princess seams were the only design element I changed. Instead of having them curve to intersect the side seam, I made the curve more gradual, and brought them up to the outer corners of the waistline edge. I think this change makes the skirt a bit more understated, and is also perhaps more flattering on someone with a larger tush. (I did end up top-stitching them to make them lie flat.)
Back kick pleats--sassy and functional.
Construction Techniques:
I went all-out with the couture details on this skirt, which was otherwise fairly simple. I did Hong Kong seam finishes on all the raw edges, and used a bias strip to finish the hem allowance, too. I also added a faced waistband made out of a tiny piece of ridonkulously expensive Liberty fabric, which I trimmed with a contrast bias strip and then hand-stitched down.
I'm really proud of the way the inside of this skirt looks! If nothing else, this project was a great opportunity to experiment with higher-end finishing techniques, in which I am largely self-taught.
So there it is, my J Crew knock-off skirt! I'm wearing it today, as pictured, along with my paisley Ute blouse for an entirely made-by-J outfit. And I'm sure the skirt will be seeing lots of use as part of my summer mini-wardrobe, and into the start of the school year in the fall.
Just as a reminder, here's the inspiration skirt:
And here's my version:
Design Elements:
The pleat and pocket are spot-on, and add a nice bit of interest.
The back princess seams were the only design element I changed. Instead of having them curve to intersect the side seam, I made the curve more gradual, and brought them up to the outer corners of the waistline edge. I think this change makes the skirt a bit more understated, and is also perhaps more flattering on someone with a larger tush. (I did end up top-stitching them to make them lie flat.)
Back kick pleats--sassy and functional.
Construction Techniques:
I went all-out with the couture details on this skirt, which was otherwise fairly simple. I did Hong Kong seam finishes on all the raw edges, and used a bias strip to finish the hem allowance, too. I also added a faced waistband made out of a tiny piece of ridonkulously expensive Liberty fabric, which I trimmed with a contrast bias strip and then hand-stitched down.
I'm really proud of the way the inside of this skirt looks! If nothing else, this project was a great opportunity to experiment with higher-end finishing techniques, in which I am largely self-taught.
So there it is, my J Crew knock-off skirt! I'm wearing it today, as pictured, along with my paisley Ute blouse for an entirely made-by-J outfit. And I'm sure the skirt will be seeing lots of use as part of my summer mini-wardrobe, and into the start of the school year in the fall.
Labels:
completed projects,
contest,
drafting,
pattern review,
skirt,
techniques,
Up North wardrobe
An Overview of Hong Kong Seam Finishes
I'm not usually much for technique tutorials on this blog, largely because, as a relatively new seamstress, I don't know what I'm doing and make a lot of it up as I go along. But given how much I've been talking about Hong Kong seam finishes recently, I thought I'd write up a quick overview of how they're done. There are scads of great tutorials out there, if you'd like more detailed instructions.
I've used Hong Kong finishes twice now, once on my green dress and again on my jean skirt knock-off. When I began that project, I was in the throes of an all-out Hong Kong finish obsession, but finishing all 10 raw edges inside that skirt has cooled my ardor somewhat. I love the effect, and I think it was well worth the effort, but after this I'll be taking a break from Hong Kong finishes for a while.
A few quick notes about the advantages--and disadvantages--of Hong Kong finishes. These finishes look very polished, and definitely take your garment to the next level. They're ideally suited to heavier-weight fabrics, which would be too bulky to finish with other methods such as french seams. Because you use a bias strip of a lightweight fabric, Hong Kong finishes also let you introduce some color contrast into your design, which I did to great effect on my jean skirt.
On the downside, Hong Kong finishes are quite time-consuming, since you have to finish each raw edge separately, which results in two finishes for every seam. They also require extra fabric to do the binding, and because they add some bulk, they wouldn't be appropriate for use on lightweight fabrics.
Overview of a Hong Kong Finish:
First, sew your seam as you would normally, and press it open. Cut a 1-inch wide bias strip, and pin it right sides together to one of the raw edges inside the seam. Sew the bias strip to the seam allowance, sewing 1/4 inch from the edge. Just to be clear, you are sewing through only the seam allowance, holding it apart from the rest of the garment.
At this point, I trim the seam I just sewed down to 1/8 inch, although none of the tutorials I've read so far mention doing this. I think it makes the next step easier.
Then, fold the long edge of the bias strip around to the back, enclosing the raw edge of the seam allowance. Pin and stitch in the ditch. On my denim fabric, with navy thread, this stitching is almost invisible.
Since it will be concealed between the seam allowance and the garment, and since fabric cut on the bias is disinclined to fray, the raw edge of the bias strip doesn't need to be finished. This is what the finished seam looks like from the back (ie. with the seam allowance flipped up):
And this is what it looks like with the seam pressed open. (Now, of course, you need repeat for the other raw edge.)
There you have it: Hong Kong finishes in a nutshell!
I've used Hong Kong finishes twice now, once on my green dress and again on my jean skirt knock-off. When I began that project, I was in the throes of an all-out Hong Kong finish obsession, but finishing all 10 raw edges inside that skirt has cooled my ardor somewhat. I love the effect, and I think it was well worth the effort, but after this I'll be taking a break from Hong Kong finishes for a while.
A few quick notes about the advantages--and disadvantages--of Hong Kong finishes. These finishes look very polished, and definitely take your garment to the next level. They're ideally suited to heavier-weight fabrics, which would be too bulky to finish with other methods such as french seams. Because you use a bias strip of a lightweight fabric, Hong Kong finishes also let you introduce some color contrast into your design, which I did to great effect on my jean skirt.
On the downside, Hong Kong finishes are quite time-consuming, since you have to finish each raw edge separately, which results in two finishes for every seam. They also require extra fabric to do the binding, and because they add some bulk, they wouldn't be appropriate for use on lightweight fabrics.
Overview of a Hong Kong Finish:
First, sew your seam as you would normally, and press it open. Cut a 1-inch wide bias strip, and pin it right sides together to one of the raw edges inside the seam. Sew the bias strip to the seam allowance, sewing 1/4 inch from the edge. Just to be clear, you are sewing through only the seam allowance, holding it apart from the rest of the garment.
At this point, I trim the seam I just sewed down to 1/8 inch, although none of the tutorials I've read so far mention doing this. I think it makes the next step easier.
Then, fold the long edge of the bias strip around to the back, enclosing the raw edge of the seam allowance. Pin and stitch in the ditch. On my denim fabric, with navy thread, this stitching is almost invisible.
Since it will be concealed between the seam allowance and the garment, and since fabric cut on the bias is disinclined to fray, the raw edge of the bias strip doesn't need to be finished. This is what the finished seam looks like from the back (ie. with the seam allowance flipped up):
And this is what it looks like with the seam pressed open. (Now, of course, you need repeat for the other raw edge.)
There you have it: Hong Kong finishes in a nutshell!
Thursday, December 10, 2009
it's a good thing I don't design bridges...
...or skyscrapers. Or anything upon the construction of which lives depend. Because clearly my spacial sense is not the best.
Here's what I tried to do with my green dress project. It's a basic sheath dress with cap sleeves, and its the second pattern I drafted from my sloper. With right sides together, I sewed the lining to the dress at the neckline. Then I understitched it. So far so good. Then, with right sides together...
...I sewed all the way around the armhole. Yes I did. And if you've ever sewed a lined sleeveless dress before, or if you have a modicum of spacial sense (which I clearly don't), you realize that a dress sewn this way can't be turned. Believe me, I tried.
Here's the armhole seam that I tried to sew.

Not one to give up easily, I checked out the armhole on a similar ready-to-wear dress. It's clearly constructed in the way I had in mind: The lining is machine-sewed to the dress, and then understitched on the lower edge.

So what secret did the folks at BCBG know that I didn't? Things became clearer when I checked out the instructions from a pattern in my stash, Butterick 5147, which includes a fully-lined sleeveless dress. Here's how they pull it off.
First, you sew the dress and the lining, right sides together, at the neck and armhole edges. At this point, the center back and side seams are still open. This is critical, and I never would have though of it on my own.

Then, you turn the dress right-side out by pulling the two back pieces through the narrow openings between the neckline seam and the armhole seam. Again, I never would have thought of this.

Finally, you open out the lining and sew the side seams of both the lining and the dress in one go.

The Butterick pattern has you installing the zipper "the home-sewing way," but I don't think there's anything stopping you from sewing it Kathleen's way if you leave the edges of the neckline seam open at the center back until the zipper goes in. I admit, I won't be finding out for this project, since I'm planning on hand-sewing my armholes. But at least I'll know for next time.
Here's what I tried to do with my green dress project. It's a basic sheath dress with cap sleeves, and its the second pattern I drafted from my sloper. With right sides together, I sewed the lining to the dress at the neckline. Then I understitched it. So far so good. Then, with right sides together...
...I sewed all the way around the armhole. Yes I did. And if you've ever sewed a lined sleeveless dress before, or if you have a modicum of spacial sense (which I clearly don't), you realize that a dress sewn this way can't be turned. Believe me, I tried.
Here's the armhole seam that I tried to sew.
Not one to give up easily, I checked out the armhole on a similar ready-to-wear dress. It's clearly constructed in the way I had in mind: The lining is machine-sewed to the dress, and then understitched on the lower edge.
So what secret did the folks at BCBG know that I didn't? Things became clearer when I checked out the instructions from a pattern in my stash, Butterick 5147, which includes a fully-lined sleeveless dress. Here's how they pull it off.
First, you sew the dress and the lining, right sides together, at the neck and armhole edges. At this point, the center back and side seams are still open. This is critical, and I never would have though of it on my own.
Then, you turn the dress right-side out by pulling the two back pieces through the narrow openings between the neckline seam and the armhole seam. Again, I never would have thought of this.
Finally, you open out the lining and sew the side seams of both the lining and the dress in one go.
The Butterick pattern has you installing the zipper "the home-sewing way," but I don't think there's anything stopping you from sewing it Kathleen's way if you leave the edges of the neckline seam open at the center back until the zipper goes in. I admit, I won't be finding out for this project, since I'm planning on hand-sewing my armholes. But at least I'll know for next time.
Subscribe to:
Posts (Atom)