Showing posts with label in progress. Show all posts

Tuesday, December 14, 2010

Busy...but sewing

The other day, my mom says to me: "If you haven't called in a while, and you haven't updated your blog, I know you're busy with school so I don't worry."  Ah, the wisdom of mothers!  How right she is.  I have been very busy with school.  I'll be honest, being on the job market is definitely an emotional roller-coaster.  But despite all that, I have been sewing, so over the next few days I'll try my best to get the blog up to date.

So, stay tuned for posts about:
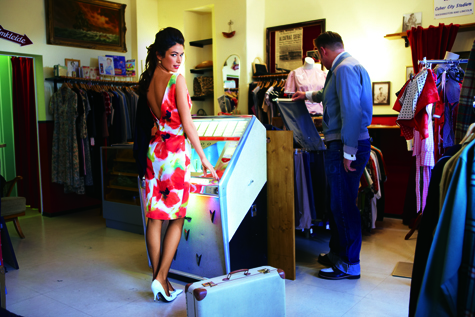
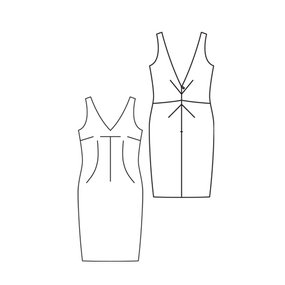
  • the Burda low-back sheath dress, 1-2010 #125, which I successfully completed in time to wear to a wedding on Thanksgiving weekend
  • my Lady Grey coat, which now has sleeves and a collar.  I'm hoping to hem this week and be working on the lining by the weekend
  • my second version of McCalls 6163, which I maintain is an awesome wardrobe-builder in disguise
  • my next project, a wool blazer.  I'm hoping I can continue to build my tailoring skills on this project, and I've asked for more tailoring books and supplies for Christmas ;-)
On a purely personal note, the Mr. is graduating from college this weekend!  Go baby go!  Returning to college as a "non-traditional" student, and balancing school with a job and adult responsibilities, is an impressive feat.  On Sunday, my man will graduate  Summa Cum Laude with his B.B.A. in Computer Information Systems, and I couldn't be more proud of him :-)

Tuesday, November 23, 2010

My new-found romance with tailoring

This weekend I made my first attempt at tailoring, and I'm in love!  Gertie's tutorials are freakin amazing, and I know I wouldn't have had the confidence to undertake a project like this without them.

So here's what I did: after pre-shrinking my wool in the drier and cutting my pieces, I finished the edges of the bodice pieces on my serger.  I'm lining both the bodice front and the side with hair canvas, as Gertie suggested.  But since my particular hair canvas is very stiff, I decided to cut all my interfacing pieces on the bias to soften them and give them more drape.  (I got this idea from Couture Sewing).

I assembled the coat front as Gertie describes: first, I basted the hair canvas to the side front, then sewed the front princess seam and trimmed away the excess hair canvas from the seam allowance.  I'm planning to use a double-topstitch, so I pressed the seam open but didn't do any of the catch-stitching that Gertie mentions.  Then, I added the interfacing to the front piece.  I taped the roll line, then basted the front interfacing in place below the line.  I haven't tried the pad-stitching yet, but that's what comes next in the process.

I expected the hand-stitching to be much more tedious than it was.  It actually went pretty quickly, and the results look totally bad-ass!  While I can't say anything about the finished product yet, I'm totally geeking out on the process, and thoroughly enjoying myself.  I see lots more tailored jackets in my future!


Unfortunatly, I realized this morning that I should have done my bound buttonhole first, since now that entire area is covered in hair canvas.  Oops!  Since it's the left side, which won't show when the coat is buttoned, I've decided to leave it as-is and do a regular buttonhole.  But for the right side, which will show, I definitely want a bound buttonhole.  So I guess that's what I'll be tackling next!

Monday, November 22, 2010

Lady Grey fitting and cutting

Contrary to my initial expectations, I had a sewing-tastical weekend.  I skipped out on my marathon training on Saturday and sewed for most of the day, while the Mr. and his classmates de-bugged the software they're developing.  Then, on Sunday, I sewed all afternoon and into the evening.  So I was able to make a ton of progress on my Lady Grey coat.

After my recent experiences trying to tweak the fit of the low-back dress, I've resolved to make muslins until all--and I mean all--of the fitting issues in a garment have been addressed.  So, I made a second muslin of my Lady Grey to check my alterations to the coat front.  Since I was happy with the sleeves on my first version, I omitted them this time.  I made sure to add the collar so I could mark the roll lines.


I'm happy with how the lapels lie, so that alteration was successful.  (Don't forget, if you make a similar alteration, that you need to alter the front facing and lining pieces to match!)  For this muslin, I also removed 1 in. from the lower edge at every seam except the center back, and I like the amount of volume this leaves.

This muslin did have one weird fit issue, which I suspect was an indirect consequence of shortening the lapel: there was too much fullness in the princess seam above the bust, which created a weird pooch/second boob.  Not the best look.  Here it is with the fullness pinned out.


I marked the new princess line with chalk on the inside, took my pieces apart, trued the lines,  re-sewed and checked the fit.  The result wasn't perfect, but my muslin has a very stiff hand and doesn't ease gracefully, so I decided not to worry about it.  Sure enough, that seam is great on the actual coat.  But I'm getting ahead of myself...

Next, I marked the roll lines using a sharpie.  (Actually, the Mr. did it.  This is one of those operations where the Heisenberg principle of fitting applies: if you turn to see the roll line, you'll change it.  So best to enlist assistance.)  It was neat how clearly you could see these lines form in the muslin, even though it's so much lighter-weight than the actual coating I'll be using.

Based on Gertie's suggestion, I decided to use my muslin pieces as the pattern to cut and mark my coat fabric, so once I was happy with the fit, I took the muslin apart, pressed each piece flat, and transferred all the markings to the pieces with a sharpie.


Here are my completed pieces.  According to Claire Shaeffer's book Couture Sewing, this is called a "toile."  (Anyone know how to pronounce this?  Does it rhyme with "foil," or with "fall"?)  Apparently, this is how patterns are made in the couture houses.  I don't think it took any more effort than transferring my markings back to the paper pattern would have.  And the muslin pattern pieces were definitely easier to pin and cut.

By last night I had everything cut, and I had a chance to start the tailoring, which I'll write about in my next post.  But so far, I'm in love!  And I can't say enough about Gertie's excellent tutorials!  But more on that soon.

Monday, November 15, 2010

Provisioning for Lady Grey

While I work on the low-back dress, I'm also getting my Lady Grey coat project ready to go.  So far, I've traced the key pattern pieces and made my first muslin:


Between the lighting and the fabric, it's difficult to tell what's going on in this picture, but over all I'm pretty pleased with the fit.

(If you're curious, that's an upholstery fabric printed with binary code that we picked up at the Herman Miller outlet in Zeeland, MI.  I picked it because it was a heavier weight, but I'll use regular muslin for my next test garment, on which I will want to mark the roll lines for the collar, as Gertie describes here.)

I cut a straight 6, which is a bit snug, but I'm still loosing weight, so I wanted to account for that in the sizing.  It buttons now, albeit without much ease, so I can wear it as soon as it's finished, and the fit should become more graceful over the next few months.

There's only one fitting alteration I'm planning to make: shortening the front of the coat, which was too long and bloused away from my body.  (Gertie also describes making this alteration by taking a wedge-shaped section out of the bodice front and tapering to nothing at the front princess seam.)

I'm also planning to remove about 12 in. total from the lower edge at the side- and princess-seamlines.  The pattern is very full at the hemline, and I think that I can tone it down a bit without straying too far from the original style of the coat.  I also think that a little less fullness at the hip will flatter my shape better, and be more versatile overall.

In the meantime, I've also been gathering my materials.  I ordered this wool tweed (on sale!) from Denver Fabrics/Fashion Fabrics Club/whatever they're calling themselves these days.  It arrived last week, and it's exactly what I wanted.


This will be my first tailoring project, so I'll need some new supplies.  (You can see Gertie's supply list here.)  I was surprised to find silk thread and weft interfacing at my local JoAnn's (not even the superstore!), and I also bought a few yards of cotton flannel to interline the coat for warmth.  At our last sewing meet-up, Melody accepted the remaining 2 yards of my binary fabric in trade for a nice-sized piece of hair canvas, so I didn't need to buy any, which was awesome.  I'm also viewing this project as an excuse opportunity to finally buy a pair of pinking shears, but I definitely need to wait till I have another 40% off coupon for that.  And as you know, I now have an excellent set of pressing hams.

I'm planning to start on this project in earnest as soon as I finish the low-back dress, which is nearly complete.  Here's hoping I'll have my second muslin finished and my fabric pre-shrunk before the thanksgiving madness begins next week!

Sunday, October 31, 2010

Back and better than ever!

I've taken a bit of a hiatus from blogging this fall, more or less unintentionally.  What have I been up to?  Well, the Mr. and I completed our first marathon in October, which was quite an accomplishment for both of us.


 I'm also working hard to finish my degree, and I'm on the academic job market as we speak.  I won't bore you with the details, but being on the market is an incredibly time consuming and fairly stressful process.  (If you're curious, you can read more about it here.  And if you want to get a sense of who I am in my professional life, you can check out joannelipsonfreed.com.)

Despite all this, I'm glad to say that my sew-jo has returned with a vengeance, and I've got several projects lined up that I'm really excited about.


First of all, I'm working on a version of Burda 1-2010 #125, the low-back sheath dress with the interesting darts.  I've made my first muslin, and need to make a few fitting adjustments, but I'm really pleased with how it's shaping up so far.  The line drawing of this dress looks a little boxy and ho-hum, but in real life the darts are super-flattering.  I'm making it in purple poly satin, to wear to a wedding later this month.

I've also gotten totally inspired by Gertie's Lady Grey Sew-Along, and I'm in the planning stages of my own version of the Colette Patterns Lady Grey coat, which will fill a gaping hole in my current winter wardrobe.  I realize I'm a bit of a late-comer to the sew-along, but I'm totally geeked about the project.  If you haven't checked it out, Gertie's tutorials on how to construct the coat using traditional tailoring techniques are amazing.  All platitudes about the internet age aside, I'm overwhelmed by the generosity of people like Gertie, who share so much time and knowledge with anyone who wants to learn, and with the inclusiveness of the online sewing community in general.  Even if you don't plan to participate in the sew-along, I encourage you to check it out.  Like I said, I'm super excited and inspired about this project, and I'm looking forward to taking my technique to the next level.

I've also got a couple of other projects in the queue, including the trench-coat from the famous September 2010 Burda magazine, and my second version of McCall 6163, which I contend is actually a great pattern if you leave off the collar and silly sleeves, and resist the urge to add tassels to the sash.

I'll write more about these projects soon, but for now I just wanted to say: it's great to be back!

Tuesday, July 27, 2010

Beignet-Inspired Skirt: The Ethics of a Knock-Off

I've been making slow but steady progress on the next element of my Up North wardrobe, an ivory cotton sateen skirt, in the style of Colette Patterns' "Beignet".  I've been thinking about making a skirt like this for a while--I'd like to think I came up with the idea on my own, before I saw Colette Patterns' summer version of the skirt, which is also ivory.  But given my track record on having original ideas, I'm not so sure!

Once I got serious about this project, I found myself faced with a dilemma--to buy the "Beignet" pattern, or to draft my own.  Colette Patterns is a small, independent pattern company, and Beignet, like all its patterns, is the original design of the company's founder, Sarai Mitnick.  I try to support these sorts of businesses whenever I can, and I've heard glowingly positive things about Colette Patterns in particular.  Their designs are distinctive, their patterns are well-drafted and high-quality, and their instructions are clear and complete.

That said, Beignet is a very simple skirt to draft.  That's not to take anything away from it's design, which is original and compelling.  But structurally speaking, once you've seen it, it's pretty clear how one would draft it.  In fact, it seemed to me that altering the skirt to fit my proportions would potentially take just as much time, and yield less consistent results, than simply drafting it from scratch based on my personal sloper.  In the end, that's what I decided to do, but I'm still pretty conflicted about the decision.  So, I'm writing up the project on this blog, but only with several statements by way of a disclaimer:

1. "Beignet" is Sarai's original design.  She deserves all credit for this classic, flattering and versatile skirt.
2. Although I drafted my own version of this skirt, I won't talk about that process here.  I'll stick to discussions of the construction process and how the skirt fits into the planning of my Up North wardrobe.
3. If you like the look of this project, you should absolutely, positively buy a "Beignet" pattern from Colette Patterns!

Ok, now that I've got that all cleared up, here's an update on how the project has been going so far.  Frankly, it's been a slog.  I've got no sewing momentum right now, but I'm trying to make progress, since I have one or two more projects in my queue that are definitely for summer, and won't transition well into fall.  (This skirt is one, and my magenta ruffle-front blouse is another.)

I'm also not totally thrilled with my fabric choice for this project.  The fabric I picked is a stretch bottom-weight, but it's semi-sheer even with the lining, and you can definitely see the interfacing and the seam allowances (and sometimes, my underwear!) through from the outside.  I've also made one or two dubious construction decisions that I find myself second-guessing, and I'm dreading making all 12 buttonholes on the front.

What's more, I'm changing size right now in all sorts of weird ways (marathon training is at least partly to blame), so I keep making fitting alterations on the fly.  I'm already sewing at the tail end of the season, and while I'd usually be o.k. with stashing a project like this in my closet for a year, I'm not at all confident that this skirt will fit me next summer.

So I'm trying to soldier through and finish the skirt soon, hoping to get at least a few wearings out of it this year.  But given my frustrations with my fabric, I'm seriously reconsidering the summer jacket I had planned to make from the leftover piece.  On the one hand, a wardrobe doesn't really seem complete without some sort of "topper."  But on the other hand, it might not be worth the grief of working with this fabric.  Would a jacket like this look terrible if the darts & seam allowances showed through a bit?  Should I give it a stab, or run screaming?  What do you think?

Monday, July 12, 2010

Jean Skirt Knock-Off: Drafting and Construction

One of the pieces I had in mind for my Up North mini-wardrobe was a denim pencil skirt.  Currently, I have several denim skirts, but the most wearable among them has been in my wardrobe for at least 5 years and is starting to look a bit peaked.

I had been thinking about making a pencil skirt, and using a piece of denim left over from an earlier ill-conceived denim skirt project.  Looking around for a picture to use in my last post, I found this skirt from J Crew:


I recognized it immediately: the previous day, I had noticed a colleague wearing this skirt, and admired it.  So I decided to create my own version, just in time to discover the Pattern Review Designer Knock-Off contest.  Clearly, the stars had aligned and my sewing of this skirt was fated!

The skirt has a couple of nice design details, which might be difficult to see in these pictures, but are much clearer if you zoom in using the viewer on the J Crew site:
  • Front pockets and small front pleats
  • Princess seams on the back, which curve around to intersect the side-seam edge
  • two back kick pleats
All of these details were easy to draft.  For the front, I just transformed my existing darts into pleats, then added the pockets.  For the back, I decided to simplify the look of the skirt by having the curved seams end at the waistband edge, rather than the side seam.  I moved the back dart to the outside upper corner of the skirt, then used it as a basis to create the princess line, which went straight down the back of the skirt and formed the kick pleat at the bottom.

It took some serious fiddling to get the shape of this skirt right (even though I made a muslin!).  In the end, I ended up taking about an inch out of the hip and waist, and more like 4 inches out below the hipline to get a tapered, pencil shape.

Inspired by my green dress, I decided to use Hong Kong seam finishes again.  Although there are tons of great tutorials on Hong Kong finishes out there, in my next post I'll share a brief one of my own. Once again, I love the effect, but doing seam finishes on all 10 raw edges inside this skirt was tremendously time-consuming, and I'll just barely get the project done in time to photograph it for the contest!

Sunday, May 16, 2010

Frock by Friday: I'm In

I recently discovered the blog Grosgrain and the "Frock by Friday" series.  Basically, the idea is for readers to join in and sew a dress together by the end of the week.  The first frock was Elaine's Coffee Date Dress.  I've already made one myself, and unfortunately, it was in the days before I understood much of anything about fit or fabric choice, so it's not really wear-able, although it is still hanging in my closet.

The next frock, which is a free download from Bernina, is super-cute: a summer shirt-dress that would be perfect for my upcoming beach trip.  So I'm in!


Here's the fabric I bought yesterday for the project: a lightweight textured cotton with an orange stripe and solid orange for the contrast pieces on the sleeve, collar, placket, and belt.  (Sorry about the wrinkles--this fabric is straight from the drier.)  And how cute are these buttons!


Unfortunately, the pattern is missing the collar piece.  (There was some debate about this in the comments, but I'm pretty convinced now that it's the collar, and not the sleeve, that's missing.)  So I'll be drafting my own collar, and I'll write up a tutorial to share with other Friday-Frockers as soon as I'm done.

Sunday, May 9, 2010

Curvy Girls Need Curvy Darts

I finally finished a draft of my dissertation chapter yesterday, so hurrah, I have a bit of time and brain-power for sewing again!  I know I owe you pics of the WGD, but we keep having lousy weather on the weekends.  (My friend Thom, who just bought a convertible, says: "What do you call the first sunny day after two days of rain?  Monday!")  So you'll just have to wait for mother nature to accommodate a photo-shoot.

In the meantime, I've been working on a muslin of my brunch dress.  My first draft of the bodice was all wrong--so wrong, in fact, that I can't actually post photos online.  For my second attempt, I increased the width of the waistband from 3 to 4 inches, which yielded a more balanced shape, a more tasteful neckline, and less of the unfortunate droopy look that characterized the first version.

I still wasn't thrilled with the fit, though.  The back was great, and the waist measurement was correct at my natural waist, but the front still seemed kind of baggy under the bust.  Then, I had an epiphany...

...curved waistline darts!

When I originally fitted my sloper, Gwen explained that I needed to sew curved waist darts.  Instead of the traditional triangle-shaped darts, these darts have more of a tear-drop or lozenge shape.  The length of the dart is the same, and its width at the widest point is the same too.  The only thing that's different is where the fullness is released by the dart.  (If you've ever taken calculus, think about the difference between a line and a curve--the rate of change.)

Once I wrapped my mind around the idea of a curved dart, I was amazed by the difference it made in the fit of my garments.  Instead of bagging weirdly, they fitted much closer to my ribcage, which created a slimmer look overall.  Understandably, this alteration is common for (ahem) "full-figured" women.

I used curved darts to great effect in both of my sheath dresses, but I didn't even think about it when I was drafting the brunch dress.  Empire waist-lines are supposed to be flattering for curvy girls because they fit close under the bust, so I was confused when my muslin didn't.  But pinning out the equivalent of my standard curved darts made all the difference!

Here's the dress before the adjustment:


And here it is with the darts pinned--what a difference!


Here are the adjustments I made in my pattern pieces to reflect this alteration.  For the bodice, I increased the width of my bust dart one inch at the waistline seam, maintaining the same length of the original dart.  For the waistband, I removed an inch on the upper edge to match the adjustment in my dart, then tapered down to nothing at the waistline, which already fit correctly.


This made a significant difference in the shape of my front waistband piece, which is now much less curved.  (The old waistband is on top in this picture, and the new one is below.)


I'm confident enough with the changes I made in my muslin that I went ahead and cut my real fabric today.  Hopefully I'll have a dress to show you soon!  I'm also pleased, in a geeky way, that I diagnosed this fit issue and was able to make the changes I needed to fix it.  You never know, but I might be starting to get the hang of this sewing thing...

Thursday, April 29, 2010

Out of the Loop

Sorry, guys, I've been out of the loop for the last couple of days due to an emergent family medical situation.  (Don't worry, we're all fine!)  I should be back to blogging now, but my sewing will probably be neglected for a few more days while I catch up on real-life stuff like buying groceries, doing laundry, and finishing my chapter.

Before I left town, I made some great progress on my WGD, which is looking awesome!  All it needs now is some inside finishing and a hem.

I also want to give a giant shout-out to the ladies at the Southeast Michigan PR group.  I had a blast at the meet-up on Saturday, and got some great advice on my dress.  Hopefully, I'll still be able to make it to this week's meet-up: I've got miles of seriously boring hemming in my future!

Wednesday, April 21, 2010

WGD 2.0: If at first you don't succeed...

Ok, folks.  I'm chalking up my first attempt at the wedding-guest dress as a "learning experience," and starting again from scratch.

Just to remind you, this is what I'm aiming for.  The original dress, called "Retail Therapy," is sold out on ModCloth.


Overall, I think my pattern is solid, and I've only made a few small adjustments to the fit for my second attempt.  I think the main problems were fabric choice and construction.

The poly charmeuse I picked the first time around is way too light and drapey, and it doesn't really stand up to the more structured look of the dress.  Also, the fabric is really shiny, which just makes the whole thing look cheap.

For my second attempt, I ordered up mid-weight poly satin from Fabric.com, and I'm much more pleased with both the color and the hand.  The charmeuse is on the left, and the satin is on the right--look at the contrast!


Fabric choice aside, my real sins with this first attempt were in the construction.  I chose not to interface the neckline, since you could definitely see a line on the right side of the fabric where the interfacing stopped.  This was a mistake.  As a result, the stand collar is droopy, and the neckline is rippled where I sewed the bodice to the lining.  I also rushed to get the skirt on and the zipper installed, again omitting interfacing, which led to (you guessed it!) more ripply seams and the most horrible, unwearable wavy zipper ever.  It's so bad, I won't even show you a picture!

Believe me, I've learned my lesson!  This time I'm interfacing EVERYTHING.  I'm also going to be much more careful not to stretch or ease my fabric when I'm pinning or sewing on the bias.  Hopefully, the heavier fabric will help with this too--unlike the charmeuse, which was super-fluid, the satin holds its shape and stays on-grain much better.  I'm also planning to hand-baste my zipper before I sew.

So far I've cut the bodice and sewed the bodice lining (which is also cut from satin), and I'm pretty pleased with the results.  My one concern is pressing: the satin doesn't want to hold a crease, and when I press it enough to flatten out a dart, it leaves a faint, shiny mark along the edge of the folded fabric underneath (if that makes sense).  I'm thinking right now that I'm going to press it anyway, figuring nobody will notice the marks.  But I'm open to suggestions: what are the "best practices" for pressing satin?

Sunday, April 11, 2010

That awkward stage

Sigh!

My wedding-guest dress is at that awkward stage.  You know, the one where you've done enough construction to know that it's not quite right, but you haven't figured out how to fix it yet?  Ever notice that you always seem to hit that stage about an hour after you should have stopped and eaten something, or put the project down and gone to bed?

My plan is to leave it be for today and work on my jeans.  I'll tackle it with fresh eyes later in the week.

Sunday, April 4, 2010

Best. Muslin. Ever.


Yowza!

This is the muslin for my wedding-guest dress, and let me just say: I looooove it! It's a little hard to see all the details in these pictures, and since my muslin is slightly sheer, I can't show a back-view for modesty reasons. But it looks just the way I pictured it in my head, and it fits great! It will look even better with the drape of the charmeuse, but I think it looks pretty darn good in muslin. And the Mister seems to agree ;-)

I had one false-start with my bodice pattern: remember folks, if you want a surplice top to overlap by x inches at the center front, you need to add the full x inches to each side. Then, when I revised the bodice pattern, I mysteriously added 2 extra inches, probably due to my pattern-paper-shenanigans.

As I mentioned, I did some really shady slash-and-spread pattern drafting this weekend in an attempt to conserve my last bit of pattern paper. I think I'll get away with it (knock on wood), but that doesn't mean it was a good idea. Don't do this!


At this point, I've drafted everything except the skirt lining, and I've used every scrap of paper in our house. But based on this muslin, I'm feeling confident and ready to cut.

Wednesday, March 31, 2010

Projects in a holding pattern

It's April (almost!), which means that the end of the semester is coming soon, and school is getting ready to kick me in the [part of the body that would hurt when kicked]. But I've still been making uneven progress on several projects. Here's an overview:

Jeans

The jeans look great. I've done everything but finishing the waistband, and I've got my rivets, tack buttons, and belt loops ready to go. But I'm waiting for my new "made by J" sewing labels to arrive so I can sew one onto the waistband facing before topstitching it down. These jeans are an accomplishment for me, and I can't resist tooting my own horn a bit, even if no one else ever sees it. Currently, the post office is holding my labels hostage (don't get me started on the post office!), but I hope to have them in hand by the end of the day today. In the meantime, I've been reading all the posts about rivets on the Pattern Review jeans sew-along to educate myself about what lies ahead.

I plan to do a full write-up with better pictures once I get my jeans done, but here are some quick snapshots to tide you over. Sorry for the poor quality--my "resident photographer" had to study for an exam this morning!


Wedding-Guest Dress

Many months ago, I had this idea for a dress to wear to a family wedding in May. Since then, I've changed my mind several times, but I've finally decided on this design, which will be more versatile:


The original dress is sold out on Modcloth, and the pictures are no longer on the site. I'm planning to make my version very similar to this one, with a few minor adjustments: I've made the curve of the raised waistline more gradual at the center front, and I've increased the overlap of the surplice top so it will be less cleavage-tastical. (Several of the reviews mentioned needing double-sided tape--not the look I'm after for a family wedding!). I'm making it out of navy polyester charmeuse, same as the original. Why mess with a good thing?

I started drafting this dress over the weekend, and I got the front mostly done when I ran out of pattern paper. Look at this skirt pattern! This is me trying desperately to use my last scraps of paper to stabilize my pattern, which was held together only by delicate paper hinges. It looks like Frankenstein's monster!


I scored a little more paper on Monday, hopefully enough to finish the project. But I definitely need to find a more reliable paper supply.

Cotton Print Blouse

Stymied in my attempts to work on my jeans and my dress, I started in on another project in my queue--a cute cotton print blouse. I bought this cotton voile months ago, but now it's finally warm enough to think seriously about spring blouses.


I debated, and finally decided on BurdaStyle Ute:


I opted for version A, with the peter pan collar, omitting the crazy cuffs. But I also like B, with the tie collar, and I've got my eyes on it for a subsequent project.

Simple enough, right? Wrong! First of all, my computer pitched a giant fit when I tried to print the pdf file--I've never had this much trouble with a print-at-home pattern before! I had to download Acrobat to make it work.

Now, I know, a sensible person would've done a muslin of a new pattern, even if the measurements for a given size matched her body perfectly. Failing that, a sensible person would have at least basted it together to test fit before sewing time-consuming french seams. Did I do any of these sensible things? Of course not! I forged right ahead. And look at the results:


It's huge! It looks like a house dress! I know the pattern is supposed to be a slightly relaxed fit, but this is not what I was after. I think I need to take out all my beautiful french seams, press the pieces, and re-cut them 2 sizes smaller. Some pieces, like the center front and the collar, I'll have to cut again, but I'm planning on fudging the others. I bought another yard of fabric, but I still have to wash it and dry it before I can do anything else.

I'm convinced I can salvage the project, and I still love the concept, but I admit I'm a bit discouraged. I'm planning to set this project aside for a bit and wait for a second wind. It's not like I won't have enough to work on in the meantime!

Thursday, December 17, 2009

a week of sewing

This week I'm on vacation, and despite fighting a cold, I've made good on my plans to spend most of the week sewing. Much of my time so far has been spend on Christmas gifts, including a fleece jacket for my mother based on Jalie 2679. But I've also finished the green dress (stay posted for pictures soon!) and sewed a failed pair of yoga pants. Right now, I'm working on this dress from the June 2009 Burda WOF


Because I've been doing so much sewing this week, we've also made some improvements to my set-up. My "sewing room," aka our living room, has no overhead lighting, so here's the task lighting that the Mr. rigged up for me:


These lights are ultimately destined for our kitchen counters, but for now, they've been mounted in a piece of cardboard and tacked to the top of the window-frame. The rig only temporary, and it isn't pretty, but the extra light has been a big help, especially with all the dark-colored fabrics I've been sewing.