I realize that part of the fun of reading sewing blogs is getting information about a pattern you might be inspired to sew. Does a certain pattern run big? Does it flatter? Is it easy to sew? Since I'm drafting most of my own patterns right now, I thought I'd post from time to time about how to draft some of the design features I'm using in my projects. Hopefully, that way I can still share my learning experiences and occasional insights with you all.
First, a quick caveat. I've learned everything I know about pattern drafting (more or less) from two sources: Gwen Powel, the instructor of my pattern-drafting class, a woman who's got the skills to to pay the bills; and Norma Hollen's classic textbook
Pattern Making by the Flat Pattern Method. I'll occasionally quote from Hollen's book, as I do in this post, and when I do so, I'll attribute it. And, if you're at all interested in learning pattern-making, Hollen's book is available on
Amazon, and it's a comprehensive and invaluable resource.
Drafting a flat-fall collar, like the one I used on my
Mad Men dress, is incredibly simple. First, you need to establish your neckline in the front and in the back. If you're using a sheath dress pattern (either commercial or your own) as the basis for your design, you might not need to make any changes to the neckline at all. If you're working with a personal sloper or "basic pattern," however, you'll probably need to lower it. There are no hard-and-fast rules for this--you can use a RTW dress as a model, or as Hollen suggests, mark your intended neckline on a muslin with pins or chalk, and check to see if it is "becoming" on you. If you adjust your neckline, use a curved ruler (or rounded household object) to create a smooth curve, and make sure that your new neckline is perpendicular to the Center Back, Center Front, and shoulder seam lines, otherwise, you'll create funny protrusions in those places when your pattern is assembled.
Next, decide on the width of your collar, and trace a second line the appropriate distance below your neckline. For this dress, I made my collar 2 inches wide. As with the neckline, though, you probably want to consider both the scale of the print on your fabric (if any) and your own proportions, in deciding on this measurement. As they say on
What Not To Wear (not that I watch it, or anything), clothes and accessories flatter best when they are "to scale" with the person wearing them.
Trace the collar onto a separate piece of paper, add seam allowances, and transfer the grainline from the bodice of your dress. Then you're good to go!
To make the button detail on my collar, I decided on the location of the overlap, then added an extension for the tab and button, again, just drafting "by eye." (Once you've drafted the collar overlap, remember to mark its location on your bodice neckline with a notch, so you can line your pieces up correctly when you sew.) I also drew a new grainline, at a 45-degree angle from the original grainline, so that my collar would be cut on the bias. I did this for style reasons--I wanted the plaid to be on an angle for visual interest--but since fabric drapes differently on the bias, it probably has other consequences for my design that I haven't really considered.
Here are my final pattern pieces. (Ignore the grain line markings on the front collar pieces, which clearly don't match up. I did cut the pieces correctly, using a modified version of the
Selfish Seamstress's
plaid matching technique.)

Usually, on a dress like this, the collar would separate in the back, on either side of the back zip. So you would cut the front collar on the fold, and for the back you would cut the collar in two pieces. But since I wanted to add the button detail in the front, I decided to have the collar run all the way around the back uninterrupted. That means I cut the back collar on the fold, and I cut two, asymmetrical front collar pieces. It also means my zipper stops just below the neck, and the dress doesn't open all the way. How you choose to style a collar like this is entirely up to you, but you do need to think ahead about the implications of choices like these for the rest of your design and its construction.
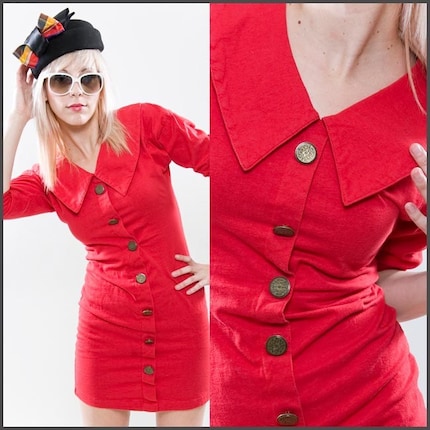
You could use this basic method to draft other styles of flat collars, too. For instance, change the shape, and you get a sailor or sailor-inspired collar, like the one on this sassy vintage dress.

(image courtesy of
BillyGoatVintage's Etsy store)
Or make a peter-pan collar on a blouse or dress with a front button closure, like this one:

(image courtesy of
Modcloth)
I hope this post was helpful--please let me know if there are things I should clarify on this post, or that I should do differently in the future.

 I love the collar and placket construction on this blouse, which I think yield a nicely finished result. But on this one, I made a bit of a goof: despite my careful measuring and marking, I managed to space my buttons and buttonholes unevenly. If you look carefully, the top two buttons are closer together than the others! By the time I realized my mistake, I had already cut the buttonholes, so I had no choice but to wear it the way it was. Because of the location of the mistake (at the top of the placket) and the pattern of the fabric, I think it's hardly noticeable, and it's not stopped me from wearing the blouse a bunch over the last few weeks.